Sign in with Google using Ionic and Django
Introduction
Implementing this feature took me about 10 hours. It’s not hard per se, but reading around on the internet showed various options. Of course, the ones I chose first brought me only pain and suffering 🥲.
So here is a quick article so that other people may benefit from my mistakes. The most important lessons:
- Do not use
rest_framework_jwt - Take the time to fill in every field in Google OAuth Consent Screens settings
ChatGPT
Also, this app is an experiment to see for myself if I’m soon going to be replaced by ChatGPT&Co. ChatGPT did around 60% of the work. It makes mistakes and needs direction, but most things can be fixed by describing what the problem is. I’ve put arbitrary numbers to show how useful this LLM was for me in the various domains of expertise required to make an Android app from scratch:
- Design / Architecture: 80%. Its analysis matched with what I was going to do.
- Backend: 90%. Sometimes it chooses unnecessary (and unmaintained) dependencies and I have to tell it not to.
- Frontend (JS): 60%. Lots of mistakes or half-assed work.
- Frontend (HTML/CSSS): 99%. I’ve only had to intervene to fix minor things. But UI design is really not my thing anyway.
- Deployment: 30%. Also, buying a domain and setting up TLS is not something I expect a LLM to be helpful with.
During development, it happened several times that I was surprised (in a good way) about the ideas or results it provided. At the end of the day, I don’t think it currently replaces a software engineer, but it can certainly help an underachieving engineer to approximate the work done by a skilled one in domains where there are lots of open-source code. For instance, I’ve also recently developed an IDA Pro extension and ChatGPT was completely useless. Worse than that, it constantly trolled me with non-existent APIs or flags.
Stack
- Ionic
- Angular
- Capacitor
- Django
We will use Json Web Tokens (JWT) for authenticated sessions.
Overview
- Settings in the Google Cloud Dev console
- Frontend: “Sign in with Google”
- Backend: verifying the
id_token - Backend: login the user
- Frontend: receive and store the
access_token - Testing on Android :(
Google Cloud Developper Console
⚠️ Don’t skip this section ⚠️
When testing on Android, I got this error:
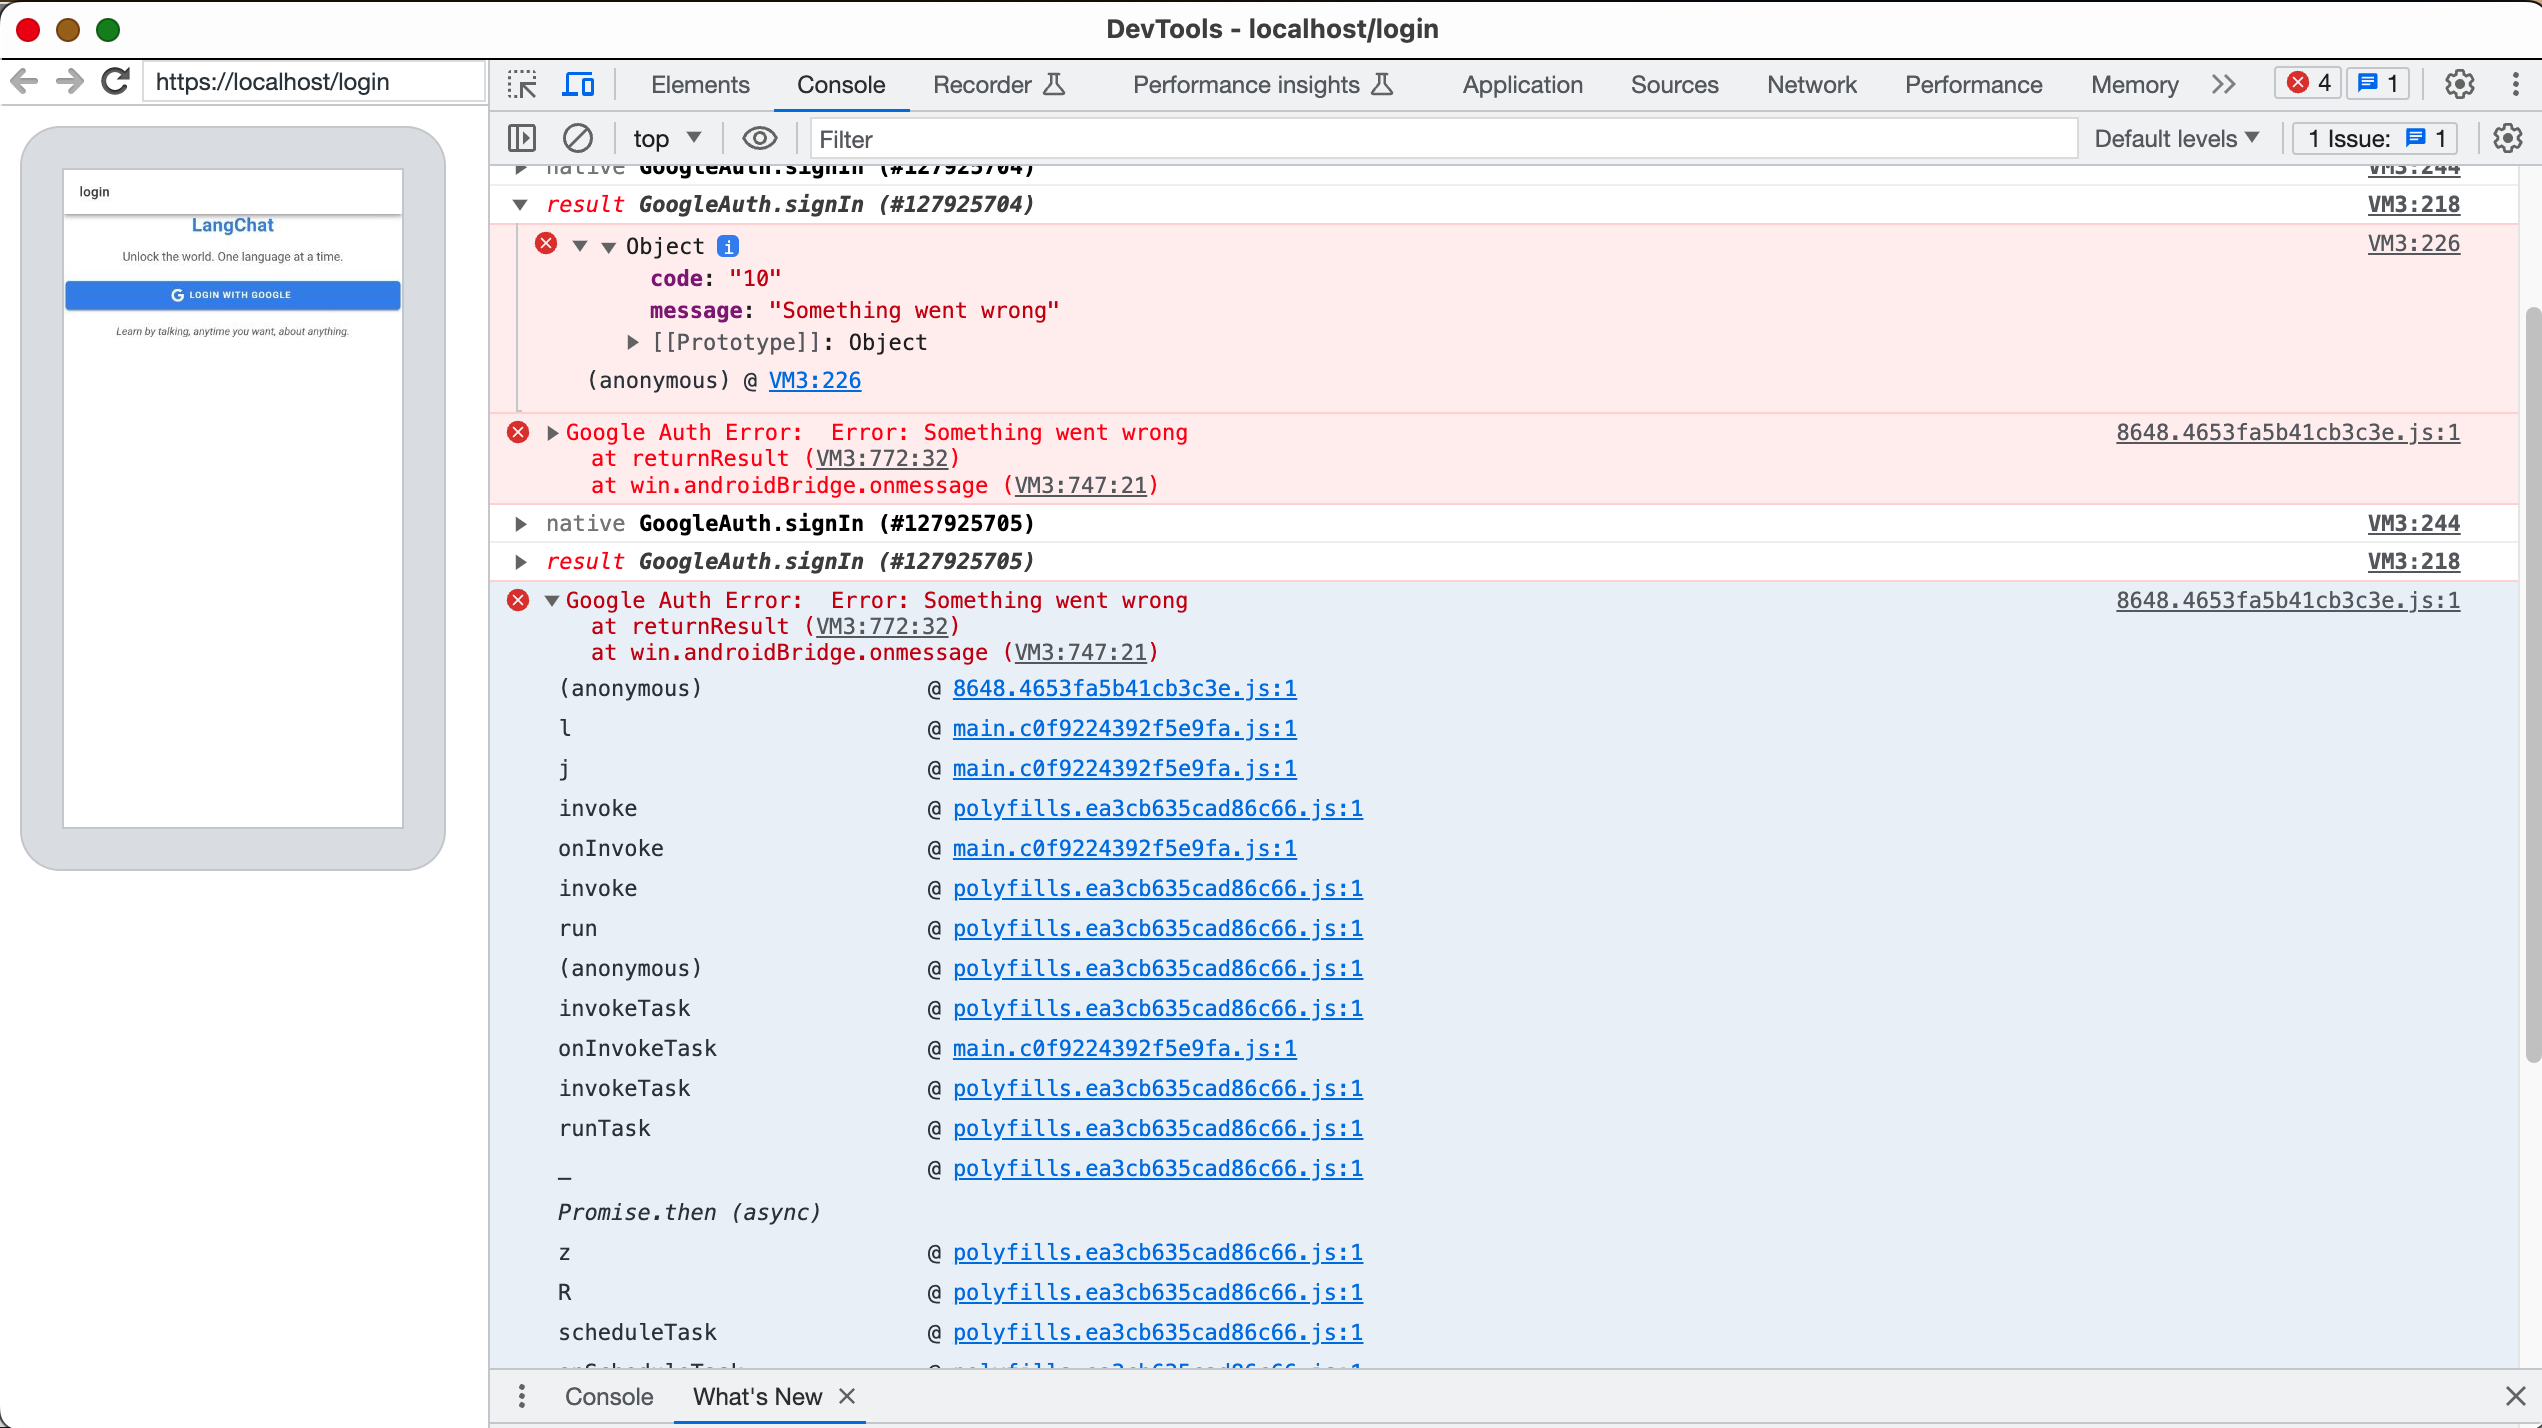
This error is quite mysterious, there is no documentation available and the “fixes” you can find by googling it show that no one has any idea why exactly it happens, so everyone and their mother come up with a checklist of things to put in your app. As of September 2023, this article aims to be the most comprehensive checklists of things to do that can avoid that error.
Spoiler: it’s not common sense, like at all.
Credentials
- Create a Client ID for the web application
- Create a Client ID for each SHA1 hash of your Android application
- iOS: I don’t know yet
Important: in your Android application, and your entire Ionic project, each time you have to provide a ClientID, you will provide the Web one (step 1), not the Android one.
You still need to have ones configured for Android on the Google Cloud Developper Console. Go figure 🥲.
Fill-in the information like this:

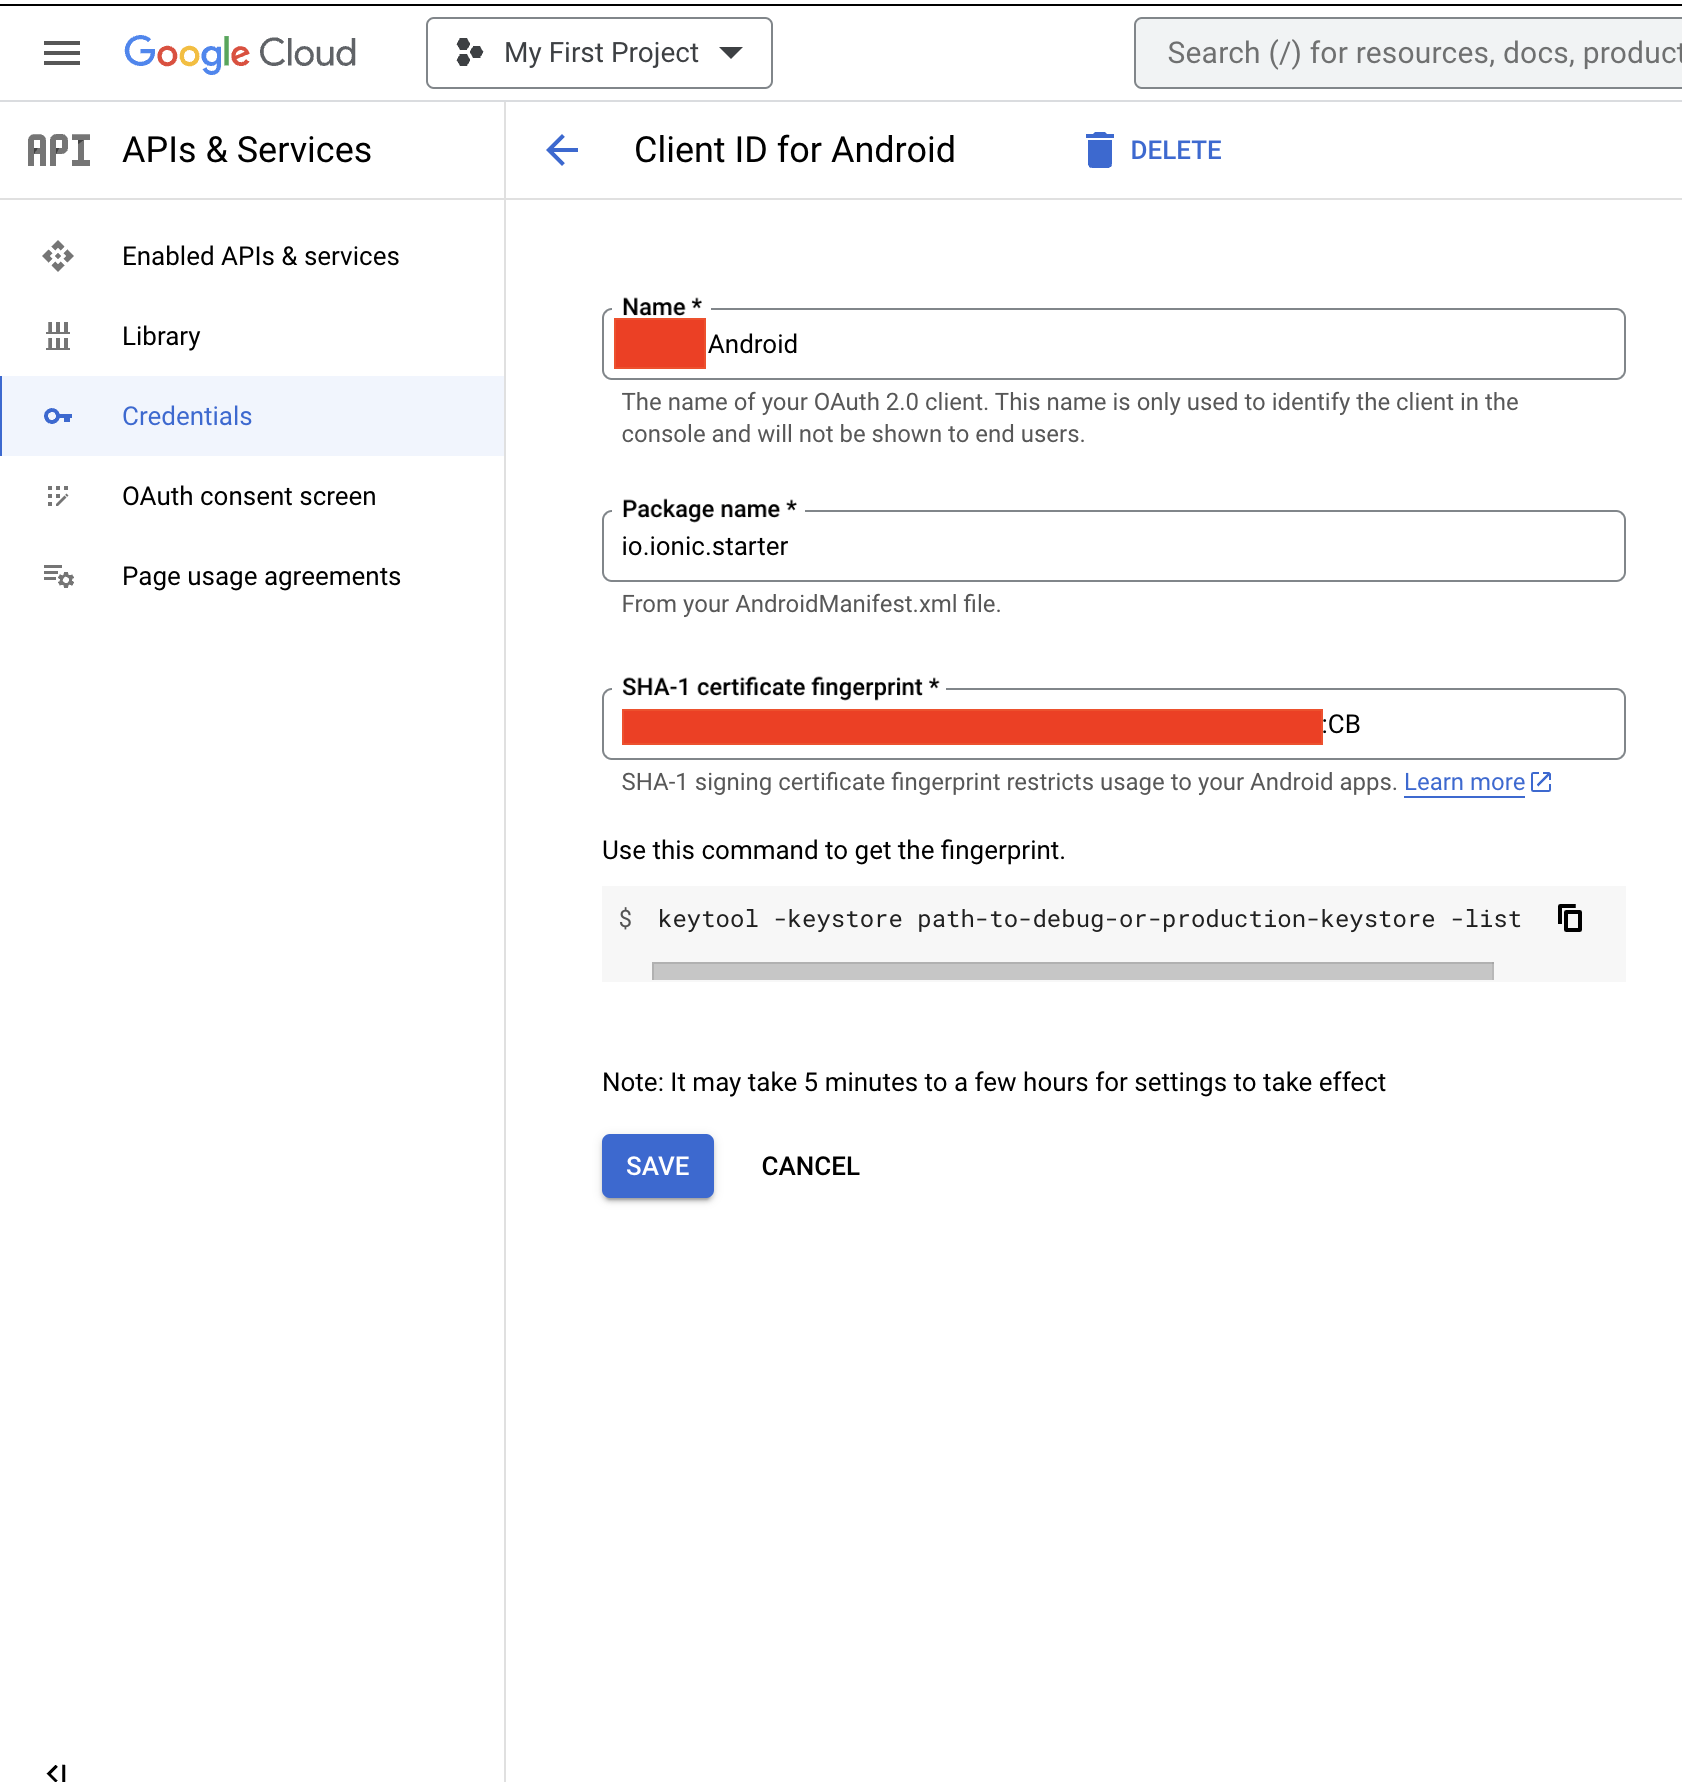
To get the SHA1 hashes, run the command and copy the values for SHA1:
./gradlew signinReport
Important: you must have one ClientID per hash you actually use:
- I changed the keystore once by mistake, and I had to reference the old one still in
~/.android/debug.keystore - The new keystore
- When you publish to Google Play Store, a new hash will be made, so configure this one also, otherwise you get the infamous “Something Went Wrong” with error code 10.
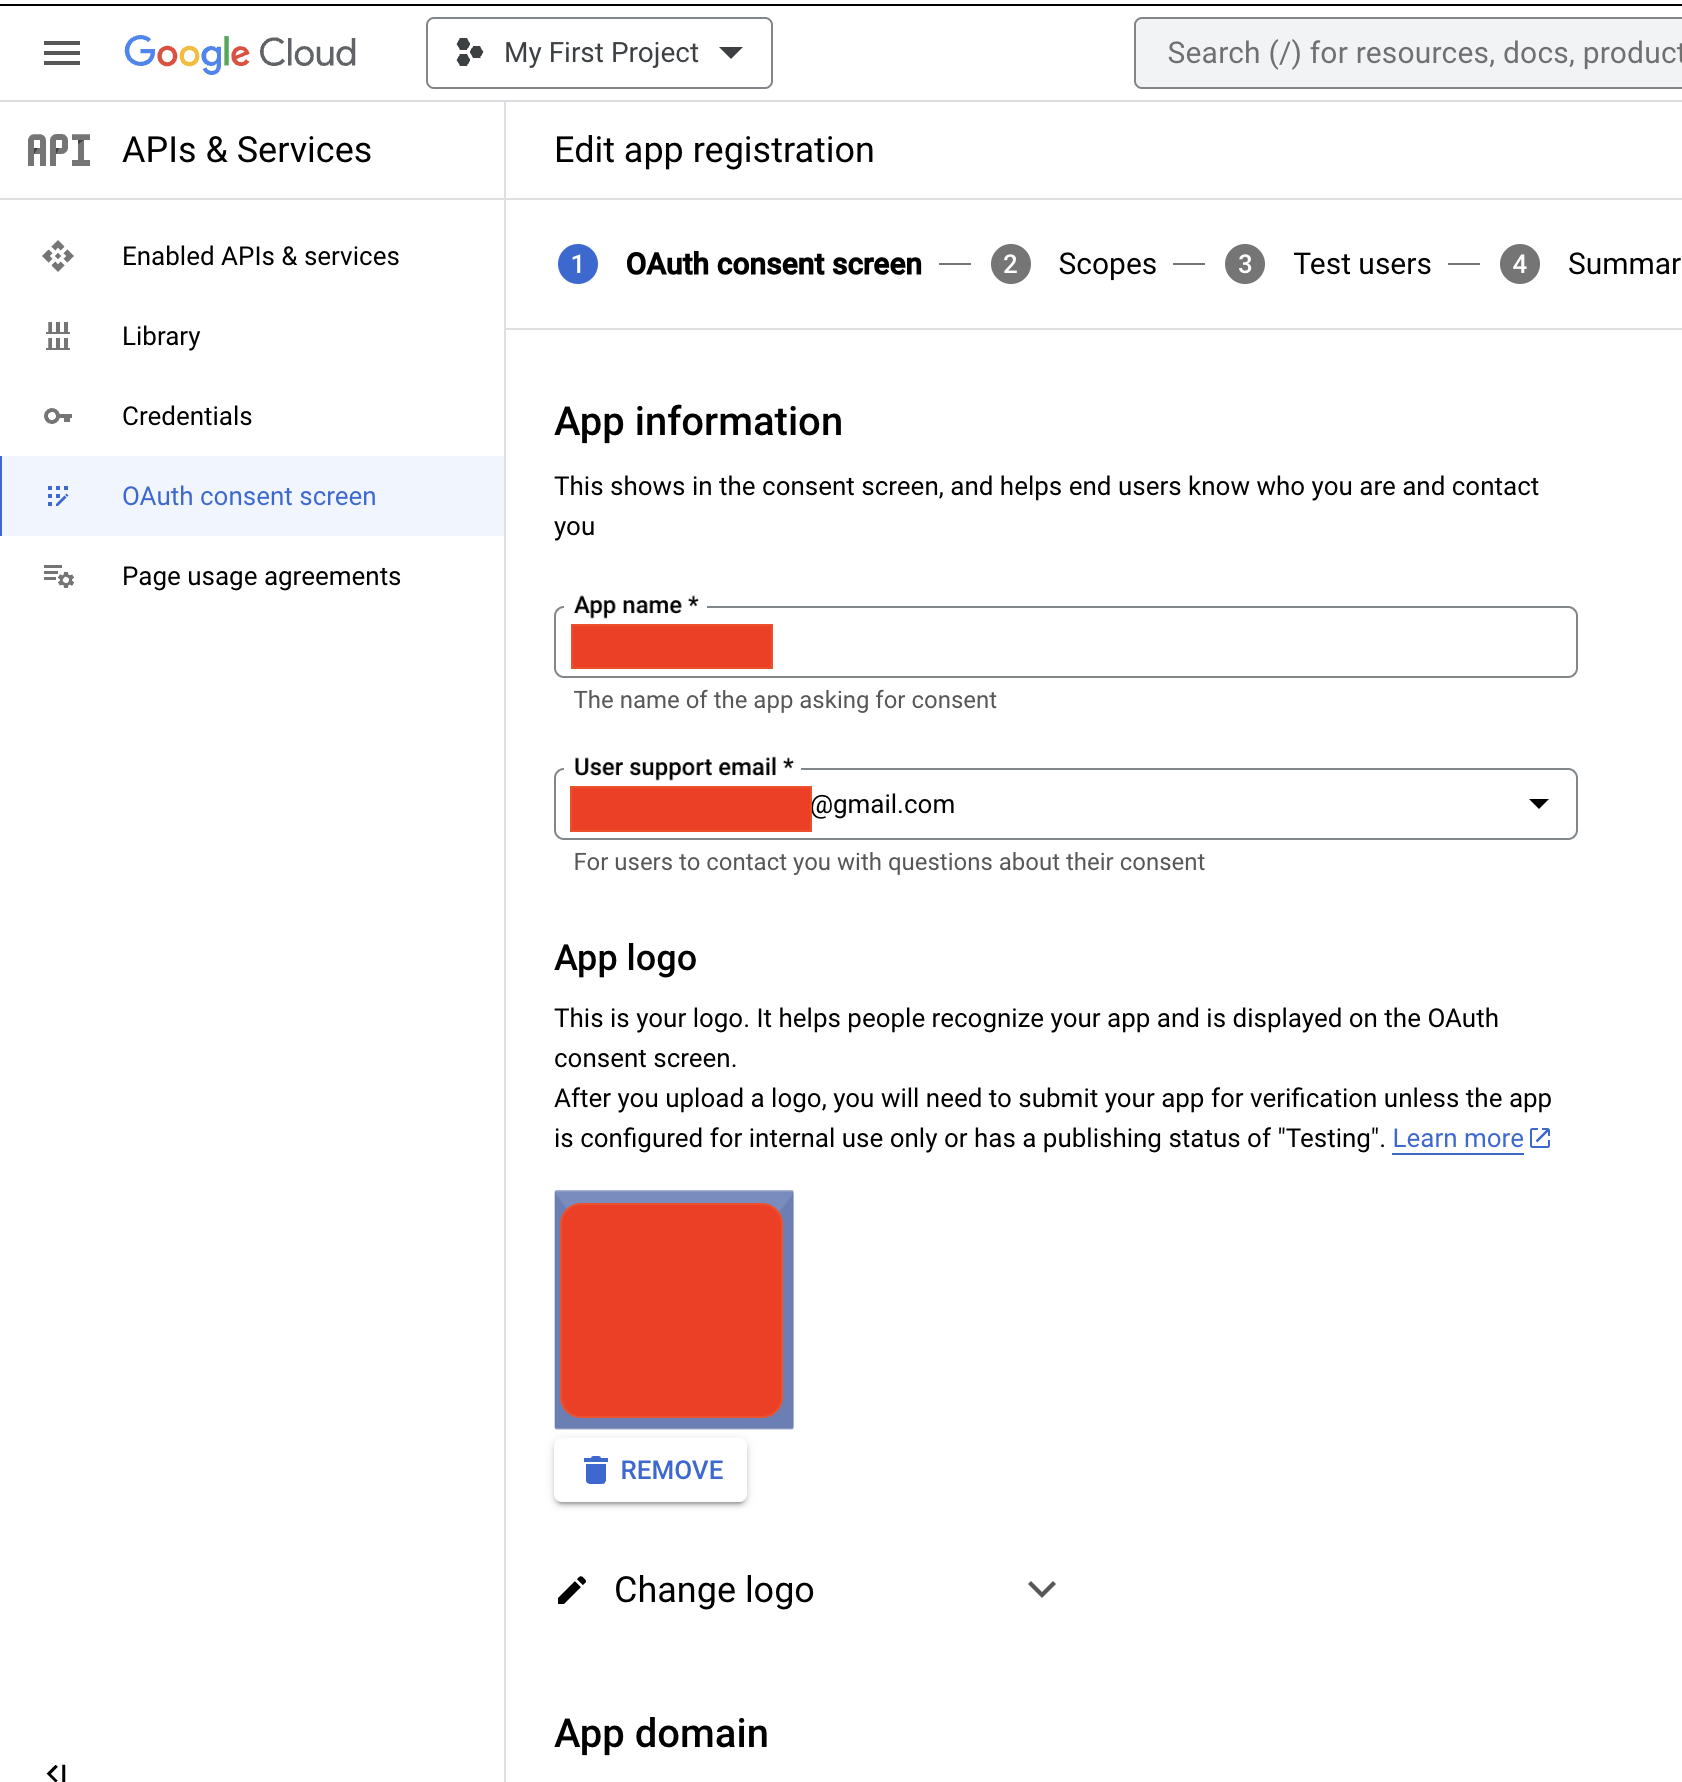
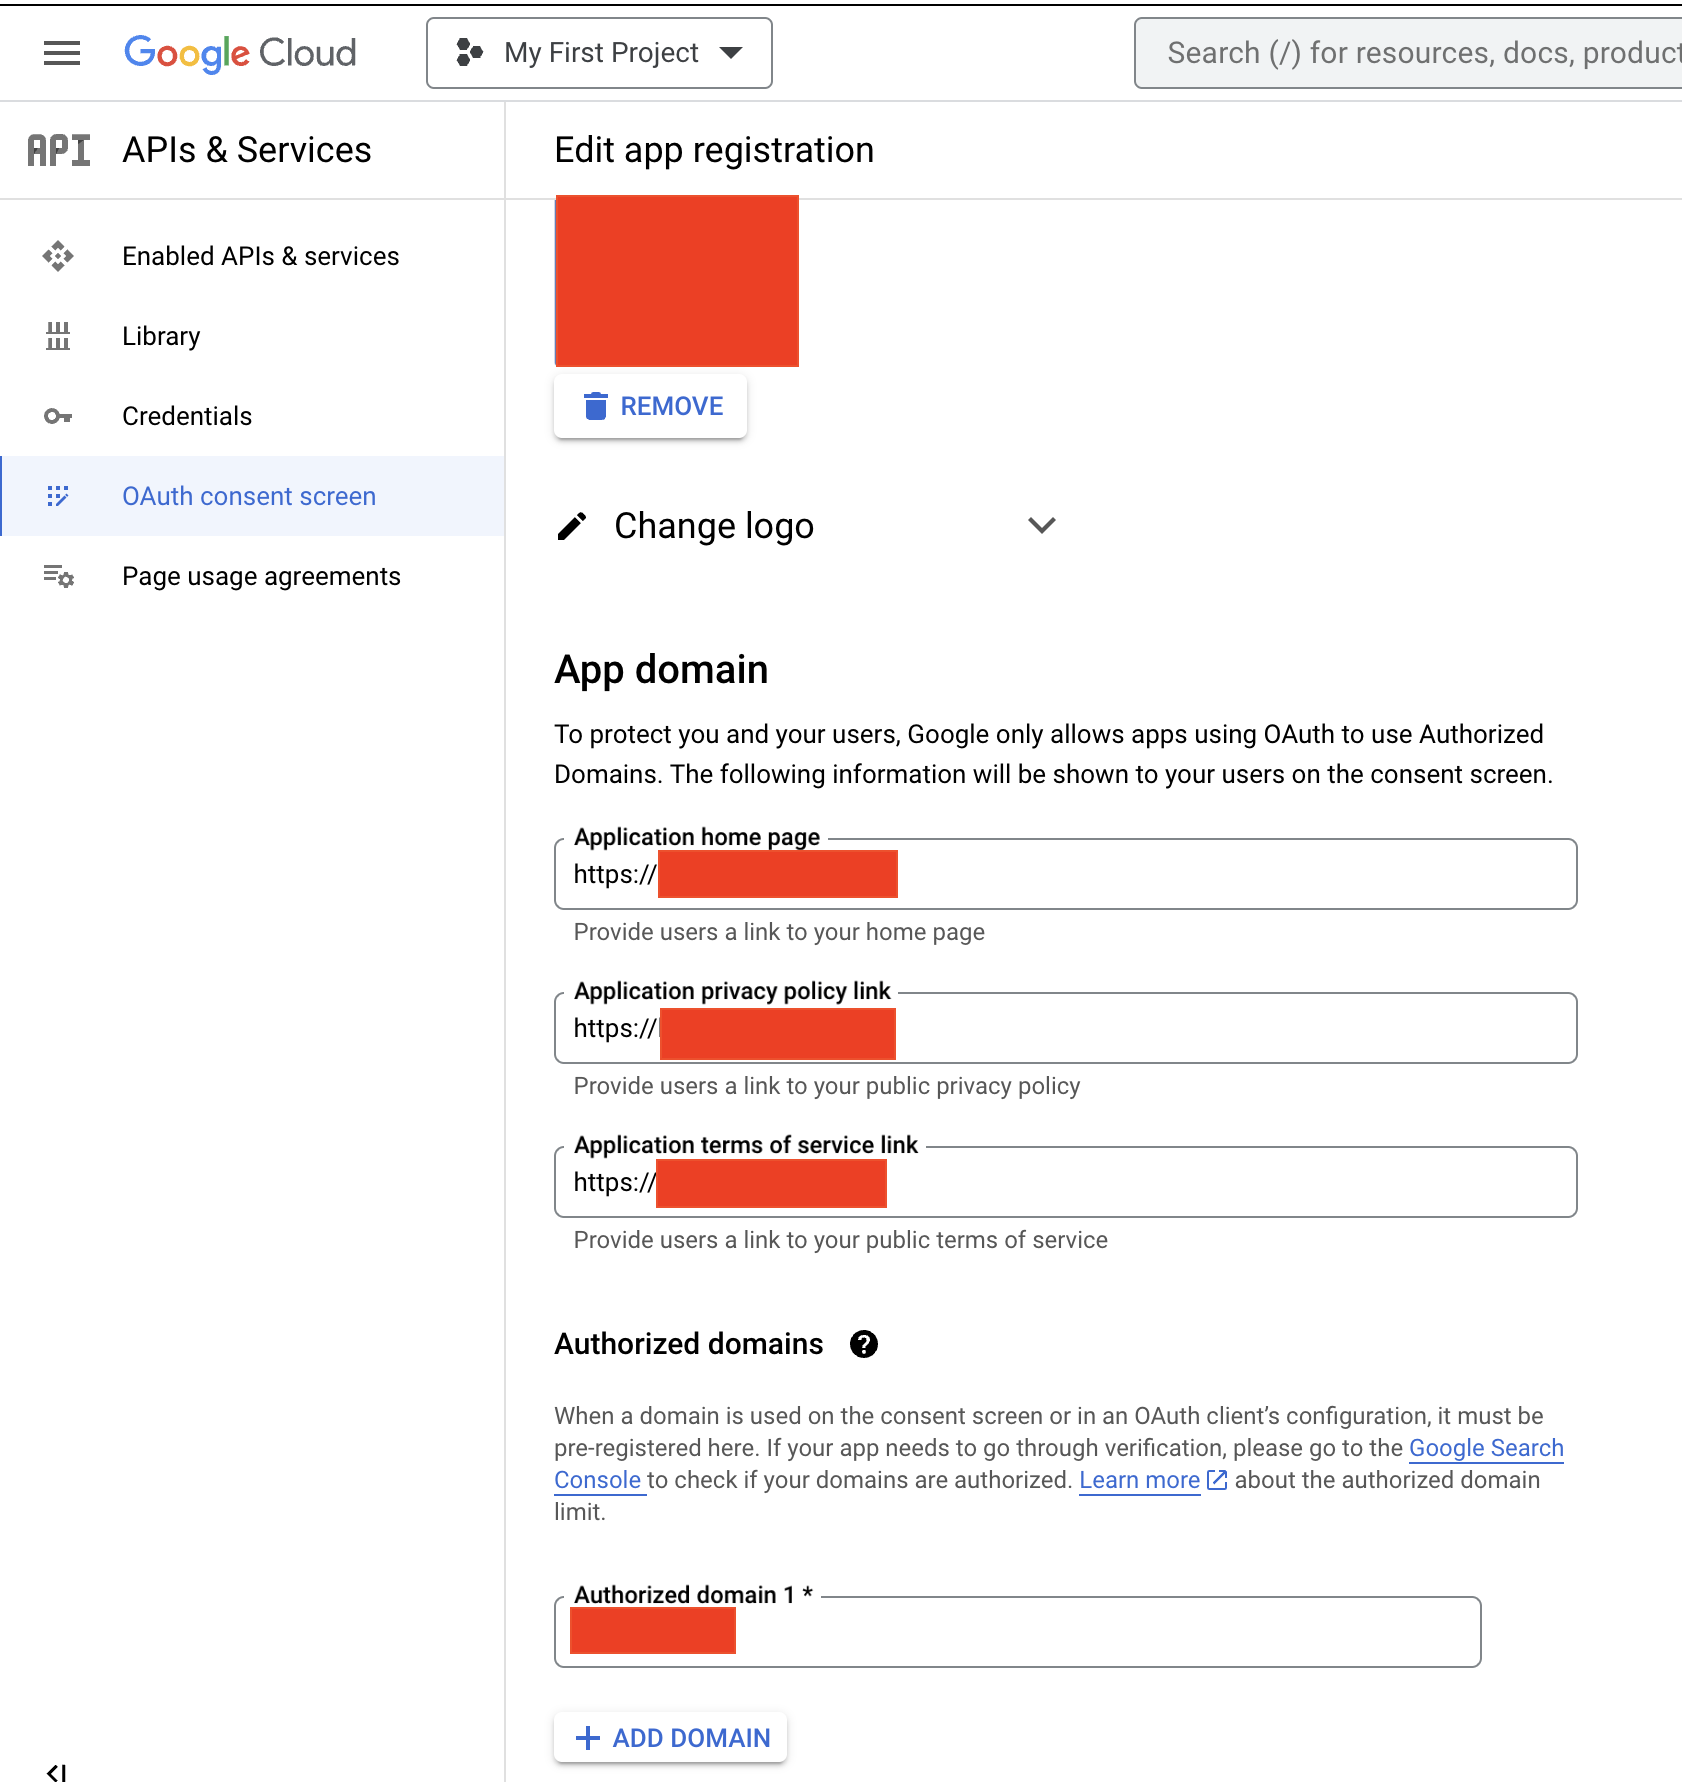
OAuth Consent Screen
Fill-in every field to avoid the mysterious error shown above.
First screen
Second Screen
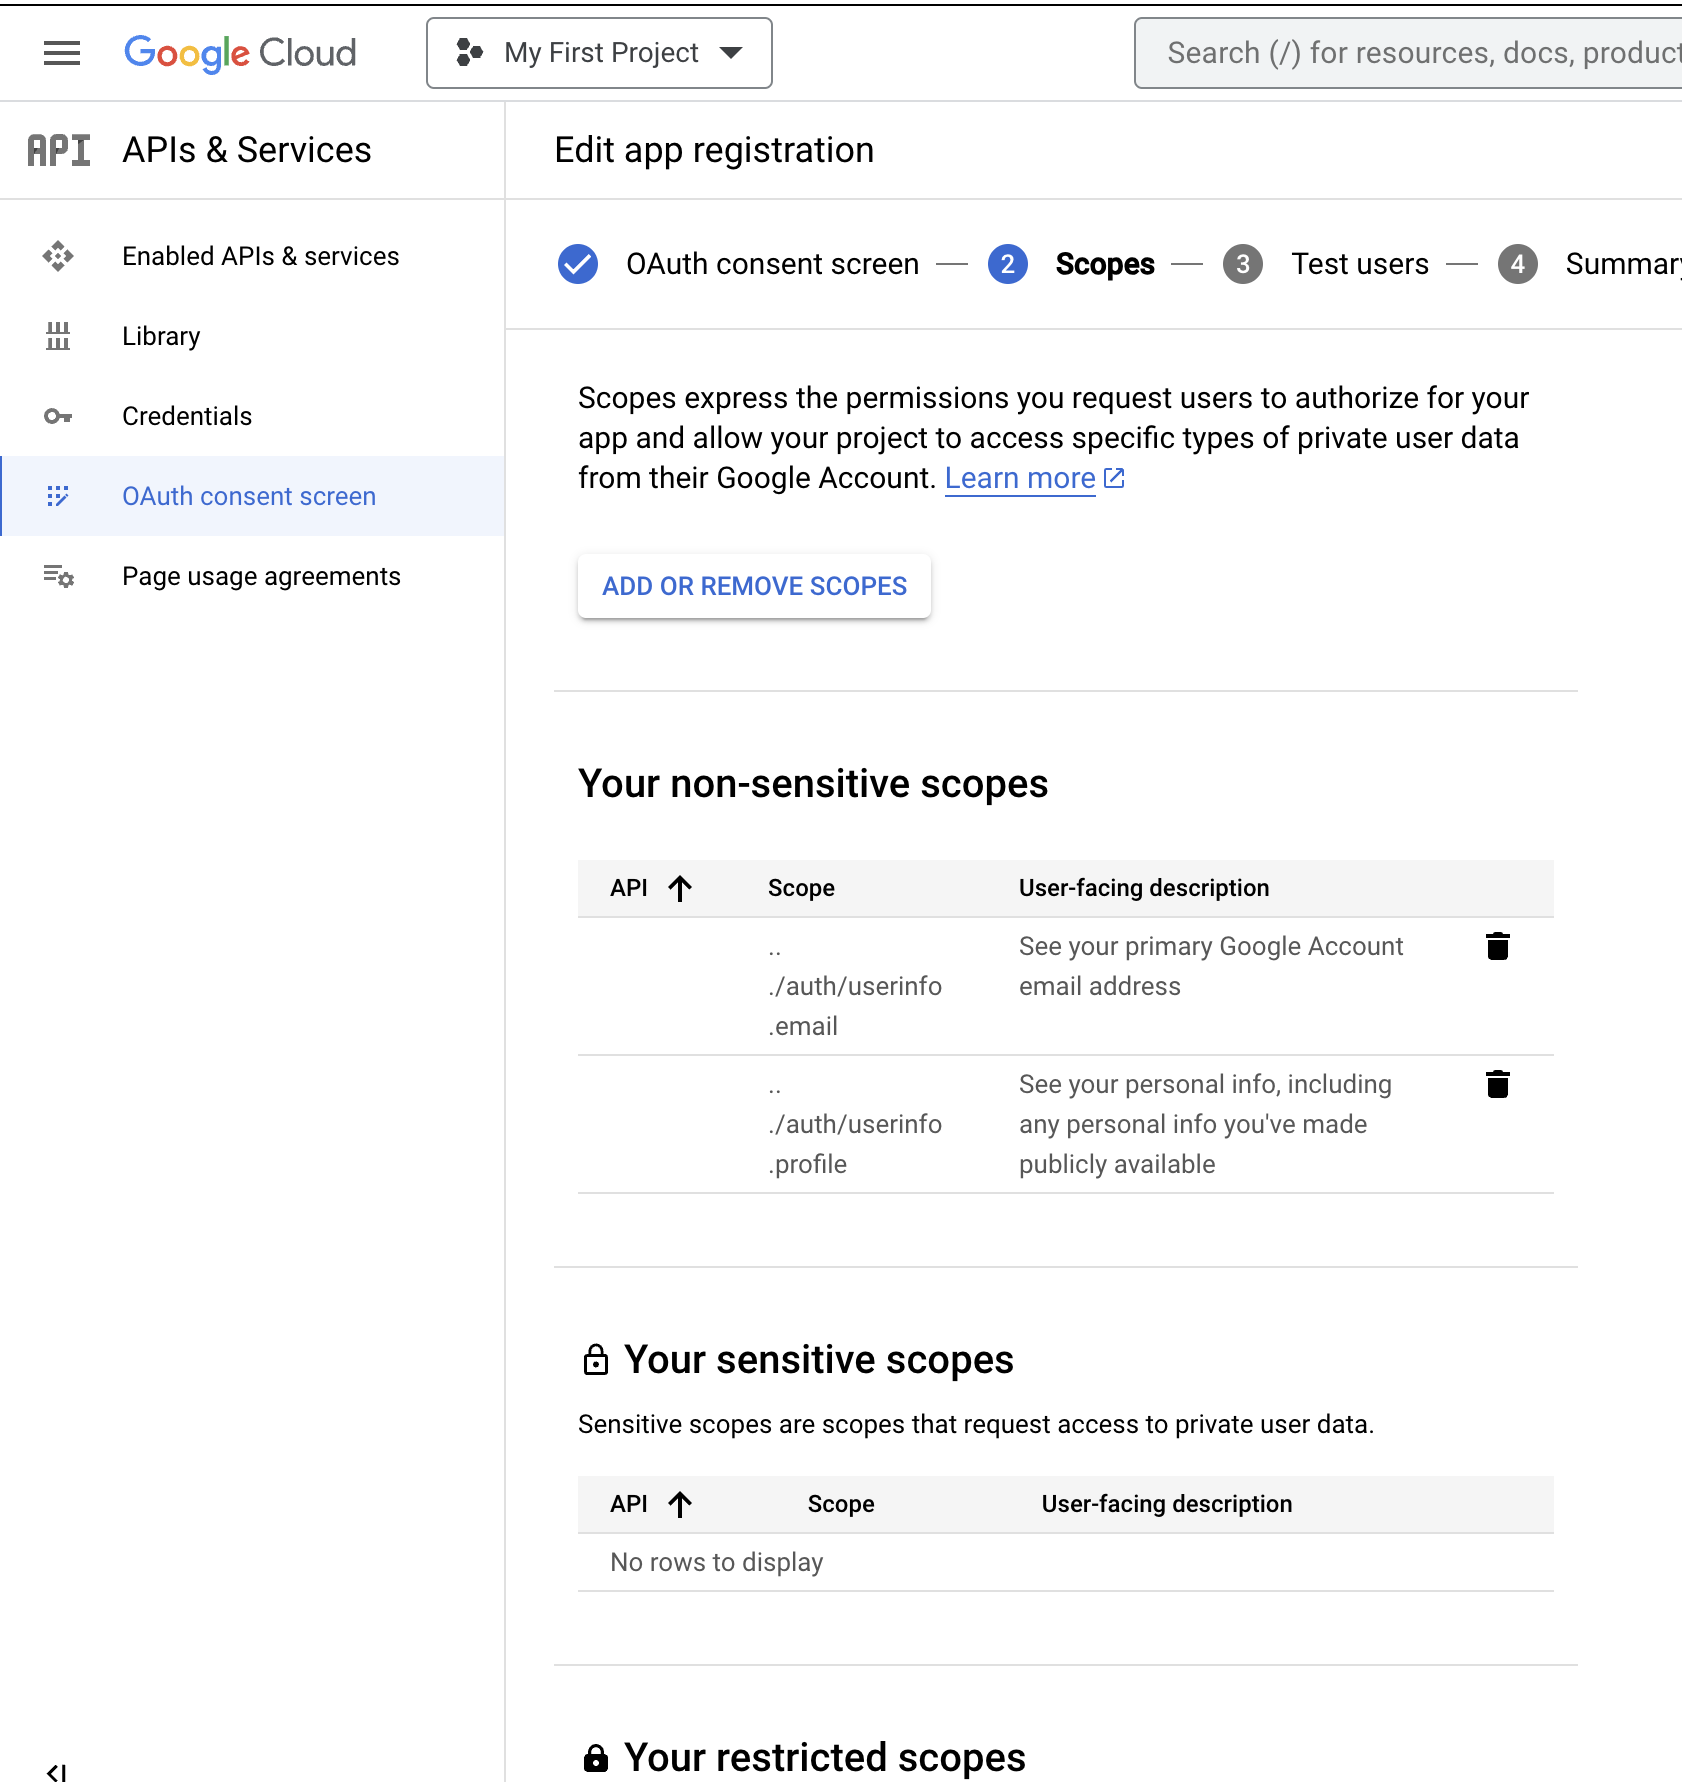
Third Screen: Scopes
Conclusion
- In Scopes, match the field you use in
GoogleAuthlibrary, otherwise you get the Error Code 10. - Provide a support and developer e-mail address, otherwise Error Code 10.
- Match the protocol you use in your app when you provide the links in the screen of OAuth Consent Screen, otherwise Error Code 10.
Frontend
ionic generate page login
Our code will:
- Check if the user is already logged in by checking if the access token is present in the Local Storage (see the Security sections if you care about that)
- SignIn with Google (client-side)
- Send the id_token to your backend to verify it
- The frontend receives and stores the access token given by the backend if the login is successful.
- The user is now logged-in, you can redirect them to the “protected” component.
Punch in the following code:
HTML
<ion-header [translucent]="true">
  <ion-toolbar>
    <ion-title>login</ion-title>
  </ion-toolbar>
</ion-header>

<ion-content class="login-page">
  <div class="header">
    <ion-title>You App name</ion-title>
    <p>Some inspiring slogan.</p>
  </div>

  <div class="login-container">
    <ion-button class="google-login-btn" (click)="googleSignIn()">
      <ion-icon name="logo-google" slot="start"></ion-icon>
      Login with Google
    </ion-button>
  </div>

  <div class="footer">
    <p>Some filler text</p>
  </div>
</ion-content>
CSS
.login-page {
    display: flex;
    flex-direction: column;
    justify-content: space-between;
    height: 100%;
    padding: 20px;
    background-size: cover;
    background-position: center;
  }

  .header {
    text-align: center;
  }

  .header ion-title {
    font-size: 28px;
    font-weight: bold;
    color: #4285F4;  /* Google's blue color */
    margin-bottom: 10px;
  }

  .header p {
    color: #666;
    font-size: 18px;
  }

  .login-container {
    display: flex;
    flex-direction: column;
    gap: 20px;
  }

  .google-login-btn {
    --background: #4285F4;
    --color: white;
    border-radius: 4px;
    display: flex;
    align-items: center;
    justify-content: center;
    font-weight: bold;
  }

  .footer {
    text-align: center;
  }

  .footer p {
    color: #666;
    font-style: italic;
  }
Component
import { Component, OnInit } from '@angular/core';
import { GoogleAuth } from '@codetrix-studio/capacitor-google-auth';
import { HttpClient } from '@angular/common/http';
import { environment } from 'src/environments/environment';
import { Preferences } from '@capacitor/preferences';
import { Router} from '@angular/router';


@Component({
  selector: 'app-login',
  templateUrl: './login.page.html',
  styleUrls: ['./login.page.scss'],
})
export class LoginPage implements OnInit {

  isLoggedIn: boolean = false;

  constructor(
      private http: HttpClient,
      private router: Router,

  ) { }


  async ngOnInit() {

    // Check if user is already logged in
    const tokenInfo = await Preferences.get({ key: 'auth_token' });
    if (tokenInfo.value) {
      this.isLoggedIn = true;
    }


    GoogleAuth.initialize({
      clientId: environment.GOOGLE_CLIENT_ID,
      scopes: ['profile', 'email'],
      grantOfflineAccess: true,
    });
  //}
  }

  async googleSignIn() {
    try {
        const googleUser = await GoogleAuth.signIn();
        // Send googleUser.authentication.idToken to your backend for verification and login
        const idToken = googleUser.authentication.idToken;
        this.sendTokenToBackend(idToken);
    } catch (error) {
        console.error('Google Auth Error: ', error);
    }
  }

  sendTokenToBackend(token: string) {
    // Use Angular's HttpClient or another method to POST the token to your Django backend
    this.http.post<any>(`${environment.BACKEND_URL}/api/login/google`, { token: token }).subscribe(
      response => {
          console.log("Successful login");
          Preferences.set({ key: 'auth_token', value: response.token });
          this.isLoggedIn = true;

          // Redirect to your component that requires authenticated users
          this.router.navigate(['/authenticated']);

      },
      error => {
          console.error("Error logging in: ", error);
      }
    );
  }
}
Backend
I chose Django for the backend because the setup is quick, authentication and authorization can be configured right away and the database engine is top notch.
Dependencies
requirements.txt:
social-auth-app-django
djangorestframework
django-rest-framework-simplejwt
Backend implementation of Google SignIn
Add a route in urls.py:
urlpatterns = [
    path('api/login/google/', google_login, name='google_login'),
    # ... your other routes
]
Punch-in the following code in views.py:
from social_core.exceptions import AuthTokenError
from google.oauth2 import id_token as google_id_token
from google.auth.transport import requests
from django.conf import settings

def google_login(request):
    body_unicode = request.body.decode('utf-8')
    body_data = json.loads(body_unicode)
    id_token = body_data.get('token')


    try:
        idinfo = google_id_token.verify_oauth2_token(id_token, requests.Request(), settings.SOCIAL_AUTH_GOOGLE_OAUTH2_CLIENT_ID)
        if idinfo.get('email_verified') == True:
            email = idinfo['email']
        else:
            return JsonResponse({'error':'Go away hacker'}, status=400)

        # ID token is valid. Get the user's Google Account ID from the decoded token
        user_id = idinfo['sub']

        # Extract email and handle user in your DB
        print(f"User ID: {user_id}")
        print(f"Email: {email}")

    except AuthTokenError as e:
        return JsonResponse({'error': 'Invalid token'}, status=400)
This code allows you to verify the id_token provided by the client. If the login was successful, you can recover the user’s email and id from the idinfo variable. If not, AuthTokenError is raised.
JWT implementation
The goal here is to setup a session for the user (to remember that they logged in). To do that, we’ll create an access token (JWT) and send it back to the client.
Then, the client must include this token in every request in the Authorization header.
User model
We need to remember users, so let’s create a custom user model.
Create a new app. Let’s call it accounts.
python manage.py startapp accounts
Inside the models.py of the accounts app, define your custom user model:
from django.contrib.auth.models import AbstractUser

class CustomUser(AbstractUser):
    pass
Update settings.py to use the custom user model:
AUTH_USER_MODEL = 'accounts.CustomUser'
In views.py:
User = get_user_model()
Create migrations and migrate:
python manage.py makemigrations
python manage.py migrate
rest_framework_jwt
First, I opted for rest_framework_jwt but it was a mistake. Once I was done with the implementation, testing Google Sign In triggered this error:
Traceback (most recent call last):
  File "/home/xxx/myapp_name/backend/lib/python3.11/site-packages/django/core/handlers/exception.py", line 55, in inner
    response = get_response(request)
               ^^^^^^^^^^^^^^^^^^^^^
  File "/home/xxx/myapp_name/backend/lib/python3.11/site-packages/django/core/handlers/base.py", line 197, in _get_response
    response = wrapped_callback(request, *callback_args, **callback_kwargs)
               ^^^^^^^^^^^^^^^^^^^^^^^^^^^^^^^^^^^^^^^^^^^^^^^^^^^^^^^^^^^^
  File "/home/xxx/myapp_name/backend/lib/python3.11/site-packages/django/views/decorators/csrf.py", line 56, in wrapper_view
    return view_func(*args, **kwargs)
           ^^^^^^^^^^^^^^^^^^^^^^^^^^
  File "/home/xxx/myapp_name/backend/myapp_name/myapp_name_app/views.py", line 326, in google_login
    token = jwt_encode_handler(payload)
            ^^^^^^^^^^^^^^^^^^^^^^^^^^^
  File "/home/xxx/myapp_name/backend/lib/python3.11/site-packages/rest_framework_jwt/utils.py", line 45, in jwt_encode_handler
    ).decode('utf-8')
      ^^^^^^
AttributeError: 'str' object has no attribute 'decode'
Turns out, to fix that you have to downgrade a dependency or patch the library yourself. Since what we want to do is the most basic JWT-related feature, there is no way we will do that.
django-rest-framework-simplejwt
The best solution imho is to use django-rest-framework-simplejwt instead.
Note: I had to install it from git on ArchLinux because:
upload: 17:33 ~/myapp_name/backend/myapp_name > ../bin/python3 -m pip install django-rest-framework-simplejwt
ERROR: Could not find a version that satisfies the requirement django-rest-framework-simplejwt (from versions: none)
ERROR: No matching distribution found for django-rest-framework-simplejwt

[notice] A new release of pip available: 22.3.1 -> 23.2.1
[notice] To update, run: python3 -m pip install --upgrade pip
I fixed it with:
../bin/python3 -m pip install git+https://github.com/jazzband/djangorestframework-simplejwt.git
Modify settings.py:
from datetime import timedelta

INSTALLED_APPS = [
    ...
    'rest_framework_simplejwt.token_blacklist',
]

AUTHENTICATION_BACKENDS = (
    ...
    'rest_framework_simplejwt.authentication.JWTAuthentication',
)

REST_FRAMEWORK = {
    ...
    'DEFAULT_AUTHENTICATION_CLASSES': (
        'rest_framework_simplejwt.authentication.JWTAuthentication',
    ),
}

SIMPLE_JWT = {
    'ACCESS_TOKEN_LIFETIME': timedelta(minutes=60),
    'ROTATE_REFRESH_TOKENS': False,
    'ALGORITHM': 'HS256',
    'SIGNING_KEY': SECRET_KEY,
    'VERIFYING_KEY': None,
    'AUTH_HEADER_TYPES': ('Bearer',),
    'USER_ID_FIELD': 'id',
    'USER_ID_CLAIM': 'user_id',
    'AUTH_TOKEN_CLASSES': ('rest_framework_simplejwt.tokens.AccessToken',),
    'TOKEN_TYPE_CLAIM': 'token_type',
}
In views.py:
from rest_framework_simplejwt.tokens import RefreshToken

def get_tokens_for_user(user):
    refresh = RefreshToken.for_user(user)
    return {
        'refresh': str(refresh),
        'access': str(refresh.access_token),
    }
Replace the google_login controller with:
from rest_framework_simplejwt.tokens import RefreshToken
from django.http import JsonResponse
from google.oauth2 import id_token
from google.auth.transport import requests

def google_login(request):
    token = request.POST.get('token')
    print(token)
    print(request.POST)
    try:
        idinfo = id_token.verify_oauth2_token(token, requests.Request(), settings.SOCIAL_AUTH_GOOGLE_OAUTH2_CLIENT_ID)
        if idinfo.get('email_verified') == True:
            email = idinfo['email']
        else:
            return JsonResponse({'error':'Go away hacker'}, status=400)

        # ID token is valid. Get the user's Google Account ID from the decoded token
        user_id = idinfo['sub']

        # Extract email and handle user in your DB
        user, created = User.objects.get_or_create(username=email, defaults={'email': email})

        if created:
            user.set_password(User.objects.make_random_password())
            user.save()

        # Generate JWT token using django-rest-framework-simplejwt
        refresh = RefreshToken.for_user(user)
        access_token = str(refresh.access_token)

    except ValueError:  # includes AuthTokenError
        return JsonResponse({'error': 'Invalid token'}, status=400)

    return JsonResponse({'token': access_token, 'username': user.username, 'email': user.email})
python manage.py makemigrations
python manage.py migrate
Security
JWT
In the frontend, we made sure to store the access_token in the Local Storage. For security reasons, that’s no okay because:
- The token can be ex-filtrated in case you have a Cross-Site Scripting vulnerability in your app.
- The token can be recovered by an attacker if the user’s device is lost or stolen and the attacker manages to gain root access on it, since the token is stored as plain-text.
Ionic provides a library for secure storage, but only in Ionic Enterprise. I recommend you implement that feature yourself, making sure that you don’t use custom crypto algorithms and leverages the Platform API so that the encryption keys are stored in the Secure World of your device.
OAuth
Token Verification
When a user signs in with Google, Google provides an ID token, which is a JWT (JSON Web Token). This token contains information about the user, but before using this information, you need to verify the token to ensure its authenticity.
Why is it important?
Without verifying the token, a malicious actor could forge a token with fabricated information. If your application trusted this without verification, it could lead to security issues.
What happens during verification?
- Signature Verification: The ID token is signed by Google. Verifying the signature ensures the token hasn’t been tampered with. Google signs the ID token using an RSA key, and during verification, the correct public key, fetched from Google’s servers, is used to verify the signature.
- Audience Verification: The token includes an
aud(audience) claim. This should contain your app’s client ID, ensuring that the token was intended for your application. - Expiration Verification: The token includes an
exp(expiration time) claim. This is checked to ensure the token hasn’t expired. - Issuer Verification: The token’s
iss(issuer) claim should match accounts.google.com or https://accounts.google.com.
By using Google’s verify_oauth2_token method, we are ensuring all these verifications are carried out.
Using ID Token Information
After the ID token is verified, you can trust the claims (data fields) inside it. One of the most commonly used claims is the email address. However, before using this email, you should also ensure that it has been verified by Google.
Why is this important? If you are using the email claim for anything important (like creating a new user in your system), you want to ensure that the email truly belongs to the user. Otherwise, someone could potentially claim any email address (even one they don’t own) during registration.
How to do it?
Google’s ID token contains an email_verified claim. This is a boolean that indicates whether the user has verified their email address.
In your code, before using the email claim, you should check:
if idinfo.get('email_verified') == True:
    email = idinfo['email']
else:
    # Handle the case where the email hasn't been verified
By following this practice, you are ensuring that the email address in the token is not only verified by Google’s systems but also actually belongs to the person presenting the token.
Ionic/Angular vs other frameworks
Before starting this project, I specifically researched this choice of framework. I ended up chosing Ionic but I (kind of) regret it.
Pros:
- Scaffholding
- Commands to automate the deployment on real devices
- Modern
- Good documentation
- My company’s clients often use it so now I can better understand their perspective
Cons:
- Deprecates too many APIs and modules: a lot of the documentation made on blogs is outdated
- You need to obfuscate the code yourself if you want to prevent low-effort copies of your app.
Now that I know a little bit better the framework, I would choose ReactNative. It has the same advantages but I really like the fact that the app is not that trivial to reverse-engineer out-of-the-box thanks to Hermes, now used by default.
You can check how easy it is to reverse engineer you app with apktool:
apktool d yourapp.apk
Then grep for some snippets of your code to know it’s location in the resulting folder. You’ll see anyone can pretty much copy paste your code into a new app, although they will still need to replicate the backend from scratch.
References
- https://enappd.com/blog/google-login-in-ionic-capacitor-app-with-angular/178/
- https://github.com/CodetrixStudio/CapacitorGoogleAuth/issues/204
- https://github.com/CodetrixStudio/CapacitorGoogleAuth/issues/220